If you’ve played Vaccine Lab Raid even once, you already know this event looks chaotic. Buildings flipping, points flying everywhere, people yelling in alliance chat like it’s the end of the world.
It’s not chaos.
It’s mechanics, and once you understand them, this event becomes very winnable.
This guide breaks down everything: rules, buildings, scoring, hidden mechanics, and the mistakes that cost alliances matches every single time.
One of the main ways to succeed on this event is to have people online and communicating. Especially in a discord. Even with more powerful players, communication will beat the other team every time.
Table of Contents
- 1 🔹 Core Gameplay Rules (Read This First)
- 2 🏆 Win Condition & Scoring (This Is What Actually Matters)
- 3 🧍 Participation & Registration Rules
- 4 ⚔️ Matchmaking Explained
- 5 🚪 Entering the Event Area
- 6 🔵 Teams
- 7 🏛️ Central Laboratory (MOST IMPORTANT)
- 8 🚑 Emergency Response Center (Quietly OP)
- 9 Mercenary Outpost (Often Forgotten)
- 10 🏭 Proto-Vaccine Warehouses (2 Total)
- 11 🧫 Proto-Vaccine Production Facilities (4 Total)
- 12 🚁 Emergency Helipad (Mobility Wins Games)
- 13 ⚡ Umbrella Energy Center (Flip Faster, Win Faster)
- 14 🧪 Proto-Vaccine Storages (NOT A FIXED BUILDING)
- 15 🧠 Strategy noteThese can swing close matches instantly.
- 16 💉 How Vaccine Points Are Earned
- 17 🔥 Base Fire & Relocation
- 18 📦 Miscellaneous (But Important) Rules
- 19 🧠 Final Priority Order (Don’t Overthink It)
- 20 💥 What Happens When a Building Is Lost
- 21 🏆 Why Vaccine Lab Raid Feels Chaotic
🔹 Core Gameplay Rules (Read This First)
No Real Troop Deaths (Yes, Really)
-
Troops do NOT die in Vaccine Lab Raid.
-
All losses are treated as wounded only.
-
Hospital capacity is unlimited during the event.
-
When the event ends (or you leave), all wounded troops are instantly healed.
👉 This is a zero-loss PvP event.
Go all in. No fear. No excuses.
Event Duration
-
Each match lasts 1 hour.
-
When the timer hits zero, everything stops immediately.
No overtime. No “one more push”.
Restricted Access
-
Once the battle starts, only the two matched alliances can enter.
-
No third-party interference. No randoms.
🏆 Win Condition & Scoring (This Is What Actually Matters)
-
Alliances earn Alliance Vaccine Points.
-
Individuals earn Personal Vaccine Points.
-
The alliance with the most Alliance Vaccine Points at the end wins.
⚠️ Important (and constantly misunderstood)
-
Only Squad 1’s result counts toward Alliance Tier Points.
-
Squad 2 still gets rewards, but does NOT affect alliance ranking.
Yes, Squad 1 matters more. Plan accordingly.
🧍 Participation & Registration Rules
Alliance Requirements
-
Alliance must be Top 20 in Combat Power in the world.
-
Registration can be done by:
-
Alliance Leader
-
R4 or higher
-
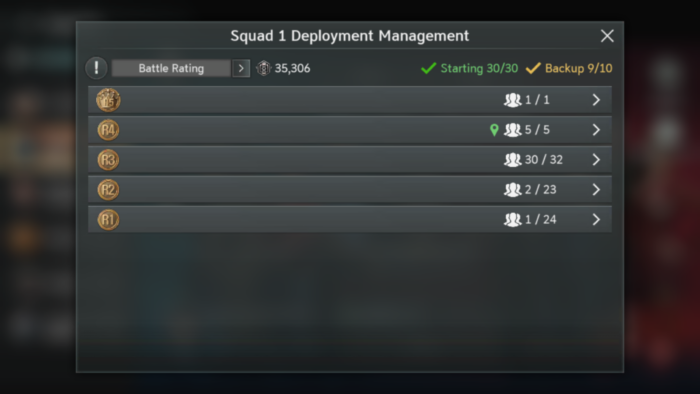
Squad Rules
Each alliance can register:
-
Up to 2 squads
Each squad:
-
30 starting players
-
10 backup players
-
Minimum 15 total participants required to proceed
⚠️ Once registration closes:
-
Battle time cannot be changed
-
Participants cannot be changed
Lock it in properly.
👤 Individual Player Requirements
Players must:
-
Be in the alliance before registration closes
-
Be selected for a squad
-
Be Mansion Level 16+
Players inactive 5+ days before registration cannot be selected.
After registration? Inactivity does not disqualify them.
⚔️ Matchmaking Explained
Matchmaking is based on:
-
Squad win rate
-
Squad matchmaking score
Matchmaking score uses the top 25 participants’ Raid Points, which come from:
-
Operative stats
-
Hero combat power
-
Troop combat power
-
Research combat power
Translation:
Stacking your top 25 correctly matters more than raw alliance size.
🚪 Entering the Event Area
When battle time starts:
-
Starting participants enter immediately
-
Backups can enter after 3 minutes
-
Only if fewer than 30 players are inside
Max:
-
30 players per squad in the event area at once
🔵 Teams
-
Blue Team = Your alliance
-
Red Team = Enemy alliance
Simple enough.
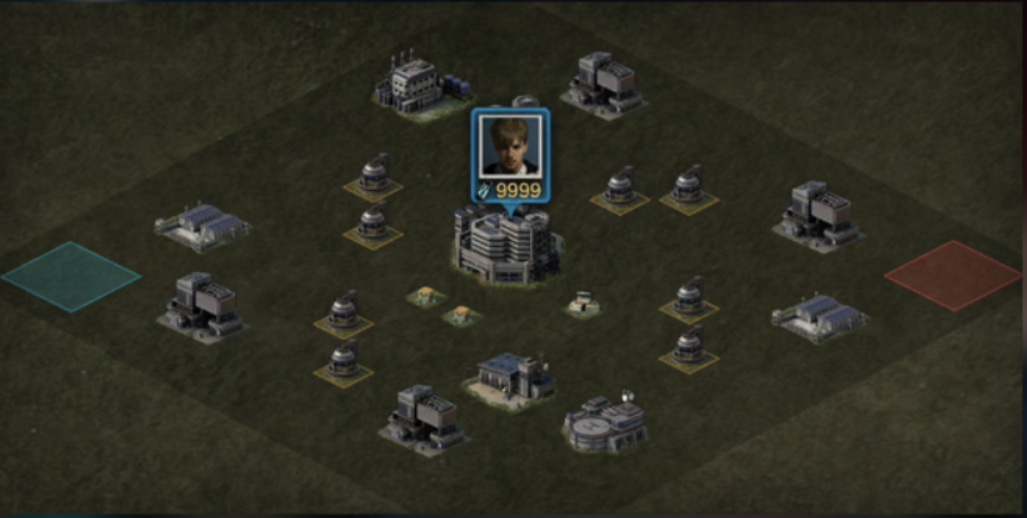
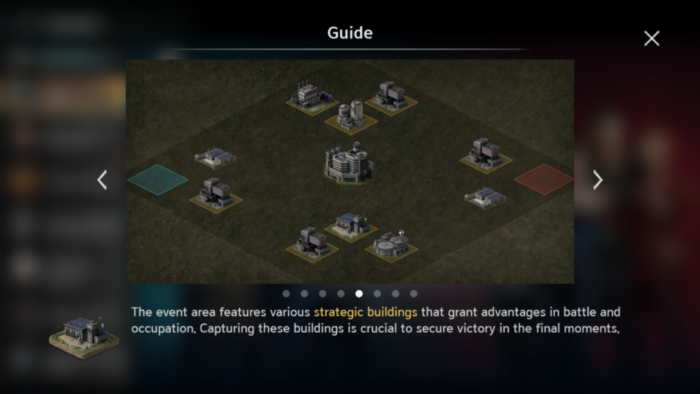
🏛️ Central Laboratory (MOST IMPORTANT)

📍 Dead center of the map
This is the core objective. Full stop.
The game itself literally calls this
“the key facility you must secure at all costs.”
That’s not flavor text. That’s math.
Points
First Capture
-
Alliance: 9,000
-
Personal: 4,500
Holding Control
-
Alliance: +1,800 / min
-
Personal: +900 / min
🧠 Reality check
If you lose Central for more than a few minutes, you are mathematically behind, even if you own side buildings.
No sugar-coating that.
🚑 Emergency Response Center (Quietly OP)
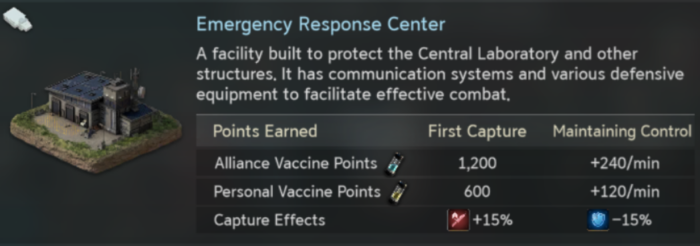
📍 Defensive support building
This one doesn’t look flashy — but it wins fights.
Points
First Capture
-
Alliance: 1,200
-
Personal: 600
Holding
-
Alliance: +240 / min
-
Personal: +120 / min
Buffs While Held
-
⚔️ +15% Attack
-
🛡️ −15% Damage Taken
🧠 Strategy note
Holding this while contesting Central is huge.
Your troops just… don’t fall over as fast.
Mercenary Outpost (Often Forgotten)

📍 Near major routes
This is the one people forget — and yes, it does matter.
What it does
-
Unlocks mercenary troops for your alliance
-
Adds pressure and flexibility in fights
Points
First Capture
-
Alliance: 1,200
-
Personal: 600
Holding
-
Alliance: +240 / min
-
Personal: +120 / min
🧠 Strategy note
Strong early grab. Helps snowball mid-map skirmishes.
🏭 Proto-Vaccine Warehouses (2 Total)

📍 East & West, near center
These are your insurance buildings.
Points
First Capture
-
Alliance: 6,000
-
Personal: 3,000
Holding
-
Alliance: +1,200 / min
-
Personal: +600 / min
🧠 Strategy note
Even one warehouse held consistently can offset short losses at Central.
Two is a nightmare for the enemy.
🧫 Proto-Vaccine Production Facilities (4 Total)
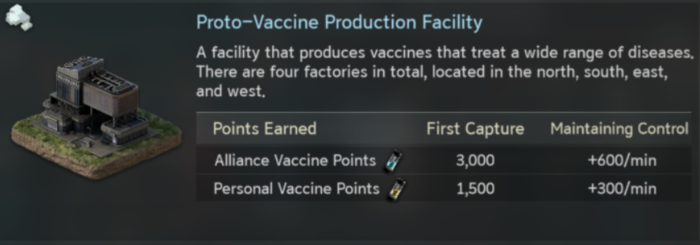
📍 North / South / East / West
Mid-tier income buildings.
Points
First Capture
-
Alliance: 3,000
-
Personal: 1,500
Holding
-
Alliance: +600 / min
-
Personal: +300 / min
🧠 Strategy note
These matter most:
-
Early game
-
During Central stalemates
-
When padding score while rotating
They’re not flashy — but they add up fast.
🚁 Emergency Helipad (Mobility Wins Games)
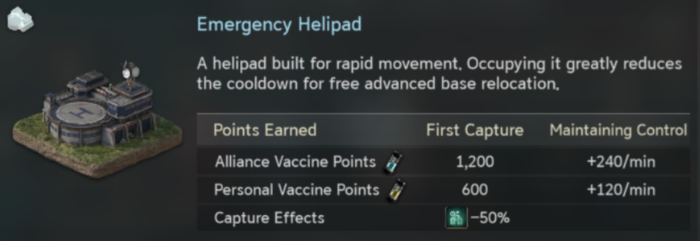
📍 Relocation control
Points
First Capture
-
Alliance: 1,200
-
Personal: 600
Holding
-
Alliance: +240 / min
-
Personal: +120 / min
Effect
-
⏱️ −50% relocation cooldown
🧠 Strategy note
This is how you:
-
Reinforce instantly
-
Save bases under pressure
-
Rotate without downtime
Good alliances abuse this.
⚡ Umbrella Energy Center (Flip Faster, Win Faster)
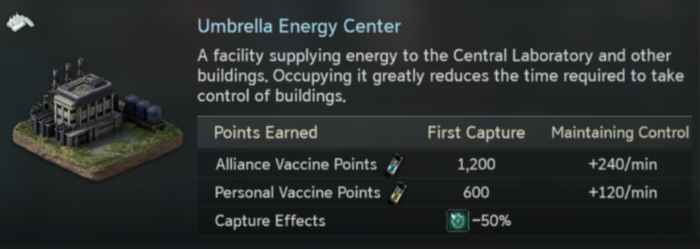
📍 Occupation speed control
Points
First Capture
-
Alliance: 1,200
-
Personal: 600
Holding
-
Alliance: +240 / min
-
Personal: +120 / min
Effect
-
🏗️ −50% occupation time
🧠 Strategy note
This lets your alliance steal buildings faster — especially during chaotic mid-game rotations.
Underrated. Very strong.
🧪 Proto-Vaccine Storages (NOT A FIXED BUILDING)

This is the one people always miss.
What they are
-
Random spawns
-
Appear twice per match
-
Grant Vaccine Points directly
🧠 Strategy note
These can swing close matches instantly.
Smart alliances assign:
-
Fast relocators
-
Floaters
-
Crate/Storage hunters
If you ignore these, you’re leaving points on the table.
🏗️ Buildings & Battle Stages (Where Matches Are Won)
Buildings unlock in stages, not all at once.
Stage 1
-
Proto-Vaccine Warehouses
-
Proto-Vaccine Production Facilities
-
Emergency Helipad
-
Umbrella Energy Center
Stage 2
-
Central Laboratory
-
Mercenary Outpost
-
Emergency Response Center
Stage 3
-
Proto-Vaccine Storages spawn randomly
💉 How Vaccine Points Are Earned
Occupying Buildings
-
First capture gives Alliance + Personal points
-
Holding buildings generates points over time
-
Some buildings also give buffs
Combat Points (Personal Only)
-
Defending: 40 Personal Points per 10,000 enemy Combat Power
-
Attacking: 80 Personal Points per 10,000 enemy Combat Power
⚠️ These do NOT add to alliance score.
Kills feel good.
Buildings win matches.
🔥 Base Fire & Relocation
-
Lose a base defense → durability drains faster
-
Durability hits zero → base is forced to relocate to a safe zone
You can’t just sit there burning forever.
📦 Miscellaneous (But Important) Rules
-
Each player gets 1 free Advanced Base Relocation
-
After use:
-
Cooldown applies
-
Further relocations require items
-
Cost increases each time
-
-
Free March Speed-Ups
-
Recharge periodically
-
Work inside the event area
-
🧠 Final Priority Order (Don’t Overthink It)
1️⃣ Central Laboratory
2️⃣ Emergency Response Center
3️⃣ Proto-Vaccine Warehouses
4️⃣ Energy Center / Helipad
5️⃣ Production Facilities
(+ grab Storages whenever they spawn)
🗺️ Map & Safe Zones
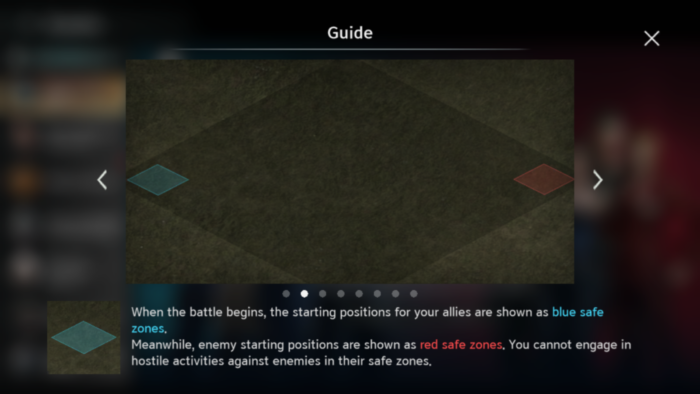
-
Blue Safe Zone = your start
-
Red Safe Zone = enemy start
-
🚫 No attacking inside safe zones
Central Lab sits dead center.
Side buildings form lanes.
Control center + 1–2 key supports = score dominance.
💥 What Happens When a Building Is Lost

-
A portion of temporary points goes to the former owner
-
The rest spill onto the map as Vaccine Crates
📦 Anyone can collect them
-
Your alliance
-
Enemy alliance
-
Backups
-
Literally anyone nearby
Lose a building carelessly, and you are handing points to the enemy.
🧠 Big Strategic Takeaways (Read This Twice)
-
Holding buildings too long without rotation is risky
-
Losing buildings late-game hurts more than early
-
Crate control wins close matches
-
You need:
-
Core defenders (Central + Warehouse)
-
Rotators (Helipad / Energy)
-
Floaters (crates + storage spawns)
-
🏆 Why Vaccine Lab Raid Feels Chaotic
Because:
-
Points aren’t purely additive
-
Timing matters
-
Crates create neutral loot fights
-
Temporary points punish overconfidence
This isn’t just a brawl.
It’s territory + timing + cleanup.
And once you understand that?
You stop panicking and you start winning.

